Technical guide to mounting IceDrive as a virtual drive on macOS and Linux

Greetings!

So you like using IceDrive and perhaps have seen that it is possible under Windows using the official app to mount your IceDrive as an os-native virtual drive.

Sadly this only is officially available on Windows so we macOS and Linux folks have to resort to something different if we want to have this feature as well.

Originating from this post community member itemx suggested using Mountain Duck. This tool however costs at least around $39.00 and isn’t available for Linux.

So if you don’t want to spend money or are using Linux I have an alternative for you. But beware the following guide is pretty technical and you have to use the terminal and type in some commands.

So that being said, if you want to dive deeper and use something free and open source you can use rclone to mount IceDrive as a virtual drive.

Prerequisites:

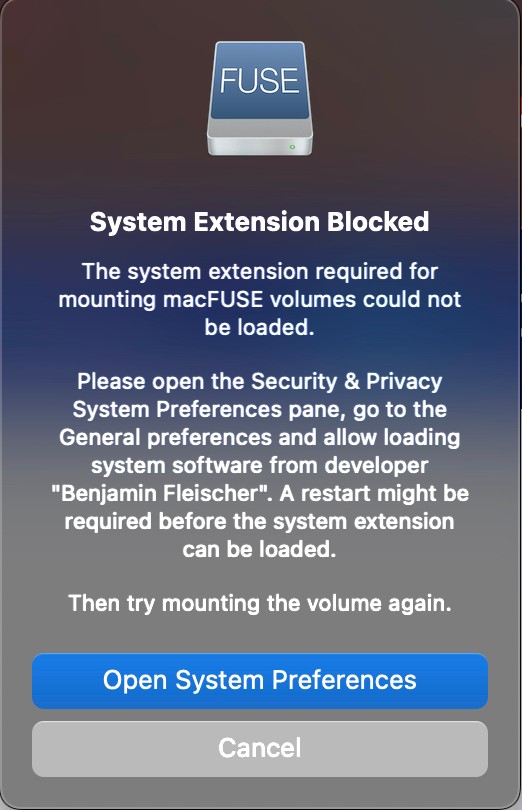
If you use macOS you have to install macFUSE first over at: https://osxfuse.github.io/
Just grab the latest stable release and run the installer.

Installation:

  1. Download the rclone binary for your os over at Rclone downloads
  2. Open a terminal and navigate to the downloaded folder by typing:
    cd ~/Downloads/rclone-v1.59.2-osx-amd64

Extra steps if you’re using macOS:

  1. Execute the binary once in order to trigger the macOS security alert by typing:
    ./rclone
  2. Go to the macOS settings and allow the app to run under the Security & Privacy section

Configuration:

  1. Enable and obtain WebDAV access to your IceDrive in your Access Dashboard of your account
  2. Go back into the terminal
  3. Create a folder where the icon for the mounted drive later should appear by typing
    mkdir ~/Desktop/IceDrive
  4. Create a config by typing:
    ./rclone config.
    Here a template on what to answer to those questions its asking you:

No remotes found, make a new one?
→ n

Enter name for new remote.
→ IceDrive

Type of storage to configure.
→ 45

Name of the WebDAV site/service/software you are using.
→ 5

User name.
→ < your IceDrive account e-mail >

Password.
→ y

Enter the password:
→ < your IceDrive WebDAV token from earlier >

Confirm the password:
→ < your IceDrive WebDAV token from earlier >

Option bearer_token.
→ < nothing. just press enter >

Edit advanced config?
→ n

Keep this "IceDrive" remote?
→ y

Current remotes
→ q

Usage:

  1. Make sure you are still in the directory where the downloaded rclone binary resides by typing:
    cd ~/Downloads/rclone-v1.59.2-osx-amd64

  2. In order to mount the drive type the following command:
    ./rclone mount IceDrive:/ ~/Desktop/IceDrive --vfs-cache-mode full --daemon

You can now close the terminal and go into your Finder/Explorer, navigate to the Desktop and drag the IceDrive drive onto your sidebar for easy access.

image

Congrats! You now have mounted the IceDrive Cloud as a virtual drive on your macOS or Linux computer!

This should behave exactly the same as the official Windows version provided by IceDrive in terms of buffering/caching and is therefore much more painless and faster to work with than just mounting it as a plain network drive your Finder/Explorer.

10 Likes

Excellent and well written guide, Many thanks @SlateDave

If there are any backend issues encountered with this just let us know and we can dive into the WebDAV server configurations

1 Like

As you mentioned…
I’d like to know how far the IceDrive’s WebDAV server can handle filenames in multibyte :wink:
Otherwise, some files in my account do not list correctly and can not be accessed via WebDAV.

I tried this, but no files appeared in the drive, so I restarted the Mac. However the drive was now gone from the sidebar, and from the desktop.

Unfortunately, you have to re-run the commands from the usage section every time you boot the Mac - just like you have to re-run the official IceDrive app and click mount on Windows after turning on your PC.

If you don’t want to do this, there is an option to run the commands automatically on startup:

  1. Open the Automator.app on your Mac (it comes pre-installed)
  2. Create a new document from there
  3. Select that you want to create an Application
  4. On the sidebar, select Library and then search for and double click “Run shell script”
  5. Paste the commands line-by-line from the usage section into the text-field
  6. On the top menu bar click File → Export
  7. Save it somewhere and remember the location
  8. Open the macOS settings → Users and Groups → Login items
  9. Add the previously created app as a new login item

Voila! As soon as you start your Mac, the IceDrive virtual drive should now mount automatically.

Thanks for the explanation. It didn’t work for me unfortunately.
I think I’ll just wait to see what Icedrive comes up with and hope it’s something good.

Please bear with us, new apps for MacOS and Linux are in the works.

2 Likes

Not sure about macOS… I use Manjaro, and within the dolphin file explorer you have the ability to map a remote webdav drive, and save credentials in the keychain, as well as save a link within the file explorer… So its basically the exact same thing as the mounted drive for windows less a drive letter.

Initial setup was incredibly frustrating, as the authentication seems to hang, and will not release unless the connection is severed and waiting for what appeared to be a 10 minute timeout, but once authenticated it works great!!. Another oddity is when connected to a VPN webdav content in icedrive will not populate. I assume this is a security GEO measure that refuses connection that has not previously connected using the auth token. -which is a good thing!!

Thanks for the additional feedback. I’ll pass this on to our dev team.

Hi Havok

Can you let me know what details you used in the webdav form within Dolphin?

Cheers

Is this also possible for the encrypted folder/area (or to reach the crypto area/folder inside this (not encrypted) virtual drive)?

You used your username, and webdav token as the password

1 Like

Just to add to this, there is another imperfect solution that I’ve found.
Before you start, enable WebDav on your user dashboard

  1. Open Finder
  2. Select “Go” at on the top menu
  3. Select “Connect to server”
  4. Use address https://webdav.icedrive.io
  5. Use your IceDrive email as the username
  6. Use your WebDAV Access Key as your password
  7. Remember details (If on your own machine)

This will temporarily map the network drive until you restart your device, but by savings your details you will only need to follow step 1-3 whenever you reboot.

Hope this helps

3 Likes

I’ve just given this a go but I’m getting an issue when trying to mount (step 2 in the usage section). Thanks